
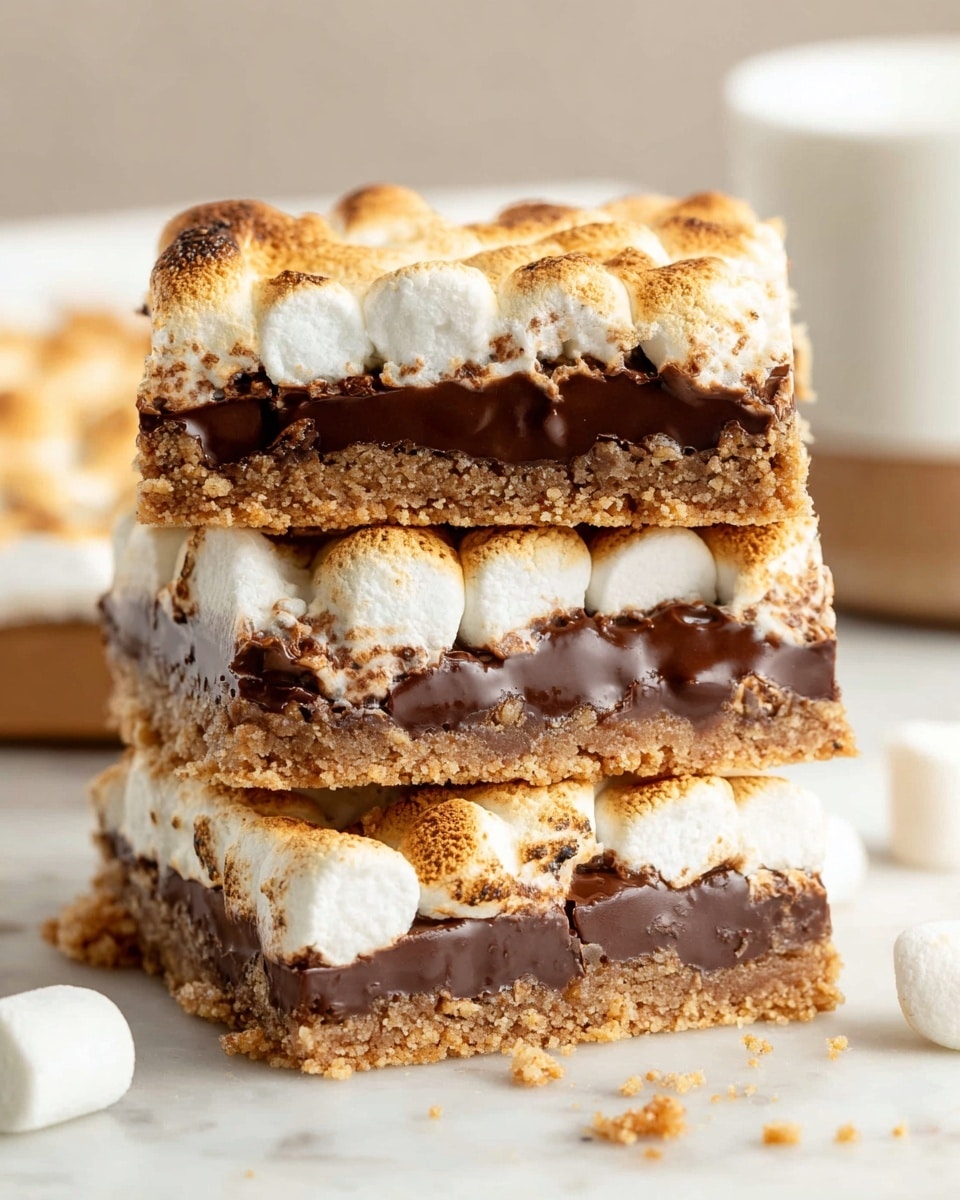
S’mores Bars Recipe
There’s something so indulgently cozy about a S’mores Bars Recipe, isn’t there? All the best parts of a campfire treat—gooey marshmallows, melted chocolate, and crunchy graham cracker crust—all packed into a pan. Honestly, these bars have become my go-to dessert whenever I want that nostalgic campfire vibe without having to build an actual fire or wait for warm weather.
Whether you’re whipping these up for a casual get-together, a kiddo’s birthday, or just because you crave something comforting, this S’mores Bars Recipe never disappoints. It’s straightforward, fun to make, and hits all those sweet, chocolatey, toasty notes I love. Plus, the fact that they’re bar form means less mess and perfect shareability—trust me, your friends and family will thank you for trying this one.
Why This Recipe Works
- Balanced Flavors: The graham cracker base brings a subtle crunch that pairs perfectly with gooey marshmallows and melty chocolate.
- Simple But Impressive: Minimal ingredients and easy steps make you look like a baking pro without breaking a sweat.
- Customizable Texture: Baking the crust ahead and broiling marshmallows lets you create that perfect crisp-tender combo.
- Crowd-Pleaser: Everyone loves s’mores, and turning them into bars means less mess and easy sharing at parties or family nights.

Ingredients & Why They Work
Each ingredient in this S’mores Bars Recipe plays a star role, working together so you get that authentic flavor and texture we all crave from s’mores. I’ve found that using good-quality graham cracker crumbs and classic Hershey’s chocolate really gives it that nostalgic kick.
- Graham cracker crumbs: Provide the crunchy, slightly sweet base that holds everything together—pack them firmly for a sturdy crust.
- Butter (melted): Binds the crumbs and adds richness; melting it helps you evenly distribute in the crust.
- Powdered sugar: Adds a touch of sweetness and helps with that firm crust texture once baked.
- Hershey chocolate bars: I love using the classic 4.4 oz bars—they melt beautifully and create that gooey chocolate layer.
- Mini marshmallows: Their small size lets you layer them tightly and get that perfect toasted top with browned edges.
Tweak to Your Taste
I love making this S’mores Bars Recipe my own depending on the occasion. Sometimes I add a sprinkle of sea salt on top to balance all that sweetness, or swap out the classic chocolate bars for peanut butter cups for an extra layer of flavor. Don’t be afraid to experiment here—you’ll find your favorite combo in no time.
- Nutty Twist: I once tried folding chopped toasted pecans right into the crust for a lovely crunch contrast—totally delicious.
- Diet-Friendly Swap: For a gluten-free version, just grab gluten-free graham cracker crumbs and you’re good to go.
- Seasonal Flavor: Around the holidays, a hint of cinnamon in the graham cracker crust amps up that cozy vibe.
Step-by-Step: How I Make S’mores Bars Recipe
Step 1: Prep and Make the Crust
Start by preheating your oven to 350°F and greasing your 9×13 pan with non-stick butter spray. In a medium bowl, mix your graham cracker crumbs, powdered sugar, and melted butter. The trick here is to press the crust mixture firmly into the pan—use your fingers like I do, packing it down so the base holds together well after baking. Then pop it in the oven for 5-8 minutes, just until the edges start to turn that beautiful golden brown. This step helps the crust harden up as it cools, giving your bars a sturdy foundation.
Step 2: Add the Melting Chocolate Layer
Once your crust is out and cooled for a few minutes, lay the Hershey chocolate bars in even layers over the crust. Try to cover as much of the crust as possible, that way every bite has melty chocolate goodness. Back into the oven they go for about 3 minutes—keep an eye on them! You want the chocolate to just begin melting and get glossy, not running everywhere.
Step 3: Toast Those Marshmallows
Sprinkle and pack the mini marshmallows tightly over the melted chocolate. Then turn your oven setting to broil—this part requires your full attention! Slide the pan under the broiler and watch the marshmallows like a hawk. They only need about 2 minutes to get that gorgeous toasted top, but as I’ve learned the hard way, they can go from golden to ash in seconds. As soon as you see that pretty brown, pull them out quickly.
Step 4: Cool and Slice
Let the bars cool completely—this is crucial for a clean cut. I pop them in the fridge for a bit to help the layers set even more. When you’re ready to cut, warm a sharp knife under hot water, dry it off, and slice quickly. Repeat warming the knife if the marshmallows start sticking. This little technique keeps the bars neat and prevents the sticky goo from turning your kitchen into a mess.
Pro Tips for Making S’mores Bars Recipe
- Watch the Broiler Closely: Marshmallows toast quickly—stay by the oven so they don’t burn (trust me, I’ve cooked off the roof of a marshmallow more than once!).
- Press Your Crust Firmly: This helps avoid soggy bottoms when layering the chocolate and marshmallows on top.
- Use a Hot Knife for Clean Cuts: Heating the knife under hot water before slicing keeps gooey marshmallows from sticking and tearing your bars.
- Let Bars Set Before Cutting: Refrigerate briefly to help the layers solidify, making slicing easier and less messy.
How to Serve S’mores Bars Recipe
Garnishes
I personally like to sprinkle just a pinch of flaky sea salt on top of the bars right after broiling the marshmallows—it adds a lovely depth and cuts through the sweetness beautifully. Sometimes, I add a few graham cracker crumbs over the top just for a little rustic texture and a cute visual touch.
Side Dishes
These bars are sweet enough to stand alone, but for a cozy gathering, I pair them with simple vanilla ice cream or a scoop of whipped cream. They’re also fantastic served alongside a warm cup of coffee or hot chocolate, especially on chilly evenings when you want that ultimate cozy treat.
Creative Ways to Present
For parties, I’ve served these bars on a rustic wooden board lined with parchment paper, then added little skewers so guests can grab a piece without sticky fingers. Another fun idea is to drizzle a little extra melted chocolate or caramel on top right before serving for an elegant twist. And if you’re feeling festive, topping with edible gold flakes or colored sprinkles definitely impresses the crowd!
Make Ahead and Storage
Storing Leftovers
I keep leftover s’mores bars in an airtight container in the fridge. Chilling helps keep the marshmallows firm and extends freshness for up to 3 days. Just be prepared—once chilled, the texture changes slightly but still tastes just as heavenly.
Freezing
If you want to prep ahead, these bars freeze nicely. Wrap individual portions tightly in plastic wrap and place in an airtight freezer bag. When you’re ready to indulge, thaw them in the fridge overnight—this keeps that gooey, melty texture intact better than freezing at room temperature.
Reheating
To revive frozen or chilled bars, I pop them in the microwave for about 15 seconds or into a warm oven for a few minutes to soften the chocolate and marshmallows gently. Just be careful not to overheat, or you’ll melt the gooey layers right off your bars!
FAQs
-
Can I use chocolate chips instead of Hershey bars for this S’mores Bars Recipe?
Absolutely! Chocolate chips can work, but they tend to melt differently than bars. Hershey bars melt into a smooth layer, which helps keep the marshmallows in place, while chips might create pockets of melted chocolate. If you use chips, try sprinkling them evenly and maybe stir them slightly into the crust before baking for the best melding.
-
How do I prevent marshmallows from burning when broiling?
Keep a close eye during broiling—marshmallows can go from lightly toasted to burnt in seconds. I recommend staying right by the oven and watching for the first signs of golden brown patches. Also, placing the oven rack a bit lower can give you a bit more control and a gentler toast.
-
Can I make this S’mores Bars Recipe vegan or dairy-free?
You can definitely swap in dairy-free butter and use vegan marshmallows and chocolate bars labeled vegan. The texture will be slightly different, but the overall flavor will still be delicious. Just be sure to check labels carefully, as marshmallow ingredients vary.
-
What’s the best way to cut these bars without them sticking to the knife?
Warm a sharp knife under hot water, dry it quickly, and slice the bars promptly. Repeat this warming step after every few cuts. This warm blade technique prevents those gooey marshmallows from clinging to your knife and keeps the slices neat.
Final Thoughts
This S’mores Bars Recipe is one of those rare desserts that instantly transports me back to summer nights by the campfire, all with way less hassle. I hope you’ll find making these just as joyful and straightforward as I have. Give yourself the permission to indulge in that perfect combination of crunchy, melty, and toasty all at once—you deserve it! Once you try this, I bet it’ll become one of your favorite easy treats to make and share.
Print
S’mores Bars Recipe
- Prep Time: 10 minutes
- Cook Time: 15 minutes
- Total Time: 25 minutes
- Yield: 16 servings
- Category: Dessert
- Method: Baking
- Cuisine: American
Description
Delicious and easy-to-make S’mores Bars featuring a buttery graham cracker crust, melted Hershey chocolate, and perfectly toasted mini marshmallows, delivering a nostalgic and gooey treat perfect for any occasion.
Ingredients
For the Crust
- 2 cups graham cracker crumbs
- 8-12 tablespoons butter, melted
- 1/2 cup powdered sugar
For the Topping
- 4 Hershey chocolate bars (4.4 ounce each)
- 1 package mini marshmallows
Instructions
- Preheat Oven: Preheat your oven to 350 degrees Fahrenheit to prepare for baking the crust.
- Prepare Pan: Grease a 9×13 inch baking pan thoroughly with non-stick butter spray to prevent sticking.
- Mix Crust Ingredients: In a medium bowl, combine the graham cracker crumbs, powdered sugar, and melted butter. Stir with a spoon until the mixture is well combined and able to hold together when pressed.
- Form Crust: Transfer the crumb mixture to the prepared pan. Evenly distribute it and firmly press down along the bottom and sides with your fingers to pack it tightly.
- Bake Crust: Bake the crust in the oven for approximately 8 minutes or until the edges start to turn golden brown. This will help the crust harden as it cools.
- Cool Crust: Remove the pan from the oven and allow the crust to cool completely before adding toppings.
- Add Chocolate Layer: Place the Hershey bars evenly atop the cooled crust, covering the entire surface as much as possible.
- Melt Chocolate: Return the pan to the oven and bake for about 3 minutes, until the chocolate just begins to melt and becomes shiny.
- Cool Slightly: Let the pan cool for 1-2 minutes after removing it from the oven.
- Add Marshmallows: Place the mini marshmallows on top of the melted chocolate layer, packing them closely together for even coverage.
- Broil Marshmallows: Set your oven to broil. Place the pan under the broiler and carefully watch the marshmallows closely for about 2 minutes. Remove immediately when they begin to brown to avoid burning.
- Set Bars: Let the bars cool completely. For easier cutting and firmer texture, refrigerate them after initial cooling.
- Cut and Serve: Use a sharp knife warmed under hot water and dried to slice the bars cleanly. Repeat warming the knife if it gets sticky between cuts.
Notes
- Use the full 12 tablespoons of melted butter if you prefer a firmer crust; less butter will make it more crumbly.
- Broil the marshmallows with extreme caution; ovens vary and marshmallows can burn quickly or even catch fire.
- Chilling the bars after broiling helps them set and makes cutting easier.
- Warming the knife prevents the marshmallow from sticking while slicing.
- For a richer chocolate flavor, consider using Hershey bars with almonds or other favorite varieties.
Nutrition
- Serving Size: 1 bar
- Calories: 250 kcal
- Sugar: 20 g
- Sodium: 150 mg
- Fat: 12 g
- Saturated Fat: 7 g
- Unsaturated Fat: 4 g
- Trans Fat: 0 g
- Carbohydrates: 30 g
- Fiber: 1 g
- Protein: 2 g
- Cholesterol: 20 mg

